


You've got a few necklaces you love individually, but wearing them together? That's where most people freeze up. Mixing lengths, textures, and pendant styles can feel like guesswork, and nobody wants a tangled mess sitting on their collarbone. The good news: necklace layering ideas are less about strict rules and more about understanding a few key combinations that actually work.
Whether you're stacking delicate chains for a minimal vibe or going bold with pearls and gold, the right layers can completely shift an outfit. At Ezra Gems, we design pieces, from our Just Gold collection to our Pearl & Gold line, with layering in mind, so every chain sits right and holds up through daily wear without tarnishing or turning green.
This guide breaks down 15 specific layered necklace combinations you can recreate with pieces you already own or build from scratch. You'll find stacks for casual days, office outfits, date nights, and everything in between, plus practical tips on spacing, mixing metals, and choosing the right focal point for each layer. Let's get into it.
What to know before you layer necklaces
Before you start experimenting with necklace layering ideas, a few fundamentals will save you from frustration and tangled chains. Two things trip most people up: picking pieces that compete visually instead of complement each other, and overlooking how chain weight affects drape and spacing. Get these basics locked in before you even open your jewelry box.
Chain thickness and weight matter more than you think
When you put two chains of the same thickness on at once, they blend into each other and you lose the layered effect entirely. Vary the weight by pairing a fine 1-1.5mm chain with a medium 2-3mm chain, and if you're going for three layers, add a chunkier 4mm+ style on the outside. This contrast is what gives each layer its own visual lane so your eye can actually read the stack as separate pieces.
Here's a simple breakdown of how to assign thickness by layer:
| Layer position | Chain thickness | Purpose |
|---|---|---|
| First (closest to neck) | 1-1.5mm | Clean base, often no pendant |
| Second (mid-layer) | 2-3mm | Can carry a small pendant or charm |
| Third (outermost) | 4mm+ | Adds structure and visual weight |
Pendants, charms, and visual clutter
A common mistake is loading every single layer with a pendant. That creates clutter fast. Instead, limit statement pendants to one or two layers and let at least one chain run clean with no charm at all. Your eye needs somewhere to rest, and a bare chain gives it that breathing room.
If every layer has a pendant, nothing stands out. Pick one focal point and let the other chains support it.
Spacing between layers should sit roughly 1-2 inches apart for a clean, readable look. If your layers bunch up and tangle throughout the day, the problem is usually that your chain lengths are too close together. A quick test: if you can't see a clear separation between chains in the mirror, you need more length difference.
Getting the right length combination from the start
Most people own one or two necklaces but need a third to build a real stack. The most versatile starting combination is a choker or collar (14-16 inches), a princess-length chain (18 inches), and a matinee length (20-22 inches). These three lengths land at distinct spots on your chest and won't crowd each other.
Skin tone, neckline, and personal style all influence which of these lengths you'll want as your anchor, but the 14/18/22 combination works as a reliable starting framework for almost any outfit. From there, you can swap individual pieces in and out without rebuilding the whole stack from scratch.
Step 1. Choose lengths that sit right
Length is the single most important variable in any layered necklace look. If your chains land within half an inch of each other, they'll overlap, tangle, and read as one messy cluster instead of a deliberate stack. A minimum gap of 1.5-2 inches between each layer gives every chain its own visual space and keeps the overall look clean and intentional.
The core length framework for layering
The most reliable necklace layering ideas start with a clear length progression. Below is a three-layer framework you can apply directly to what you already own or use as a shopping checklist when building a new stack:
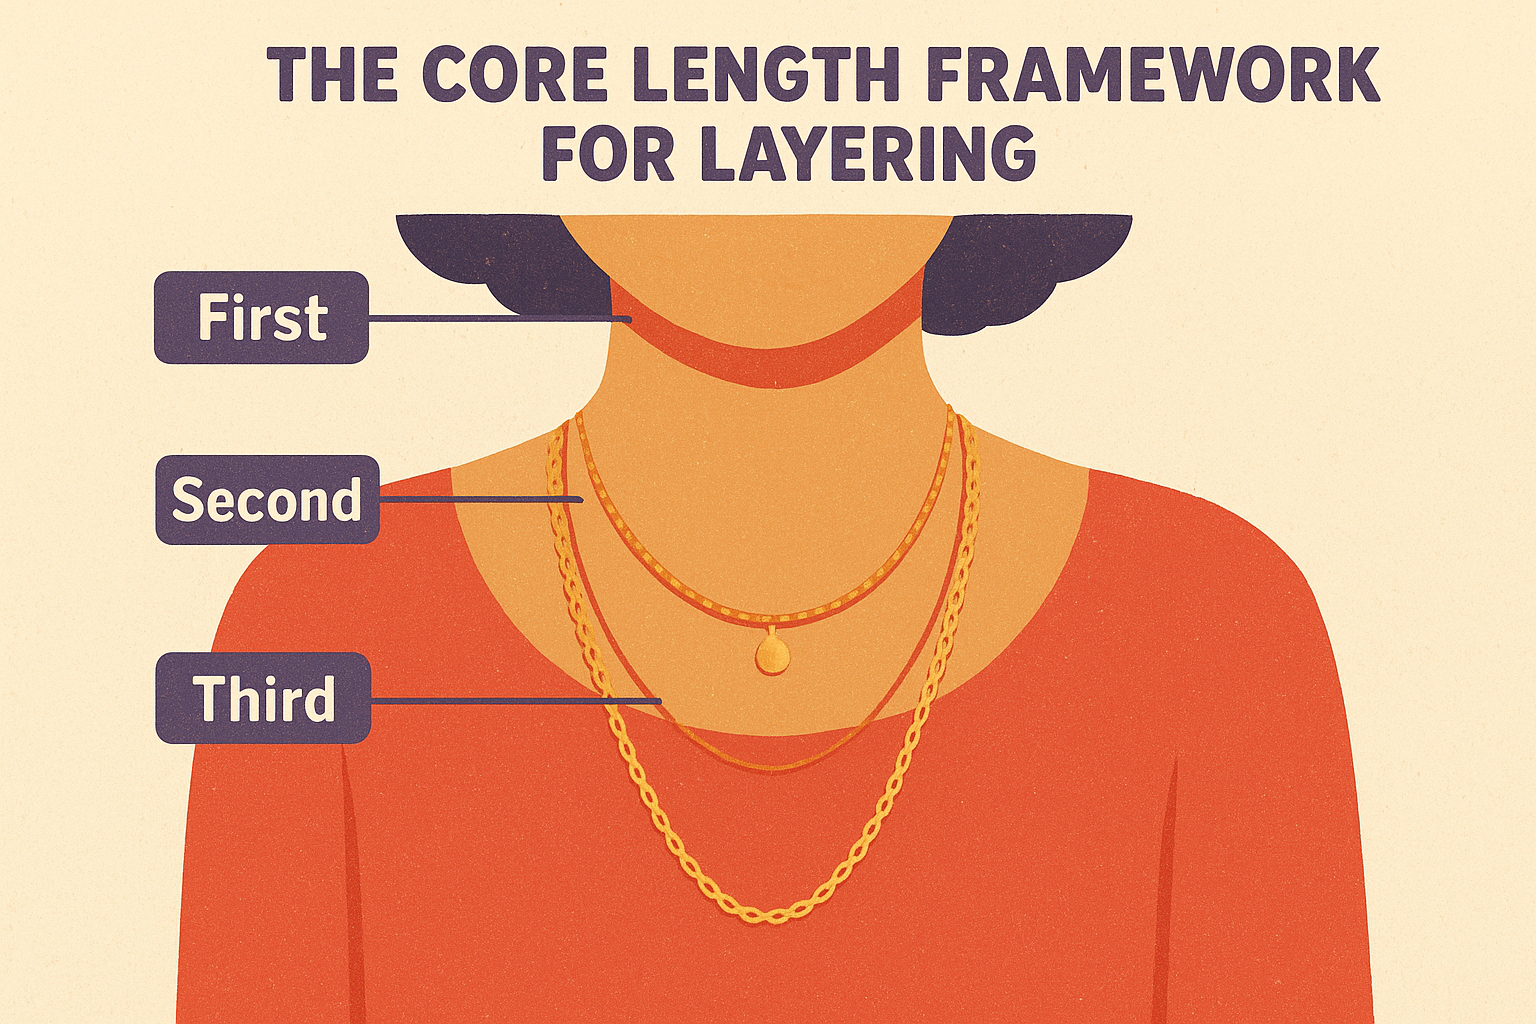
| Layer | Length range | Where it sits |
|---|---|---|
| First (choker/collar) | 14-16 inches | On or just below the collarbone |
| Second (princess) | 18-20 inches | Mid-chest |
| Third (matinee) | 22-24 inches | Lower chest or sternum |
If you only want two layers, skip the choker and pair 18 inches with 22 inches. That gap still creates enough separation for a clean look without the stack feeling incomplete.
The 14/18/22 combination works for almost every body type and neckline because each chain lands at a visually distinct spot on your chest.
How to check what lengths you already own
Lay your necklaces flat on a table and measure each one end to end with a standard ruler or tape measure. Group them into short (under 17 inches), medium (18-21 inches), and long (22 inches and above). If you find two chains in the same group, they'll crowd each other when layered. Here's what to do:
- Same group, thin vs. thick: keep both, but assign one as the base layer and one as the outer
- Same group, similar thickness: replace one with a longer piece to restore the gap
- Only two lengths total: add a third chain at least 4 inches longer than your current longest piece
Step 2. Build around one anchor piece
Every strong stack starts with one anchor piece that sets the tone for everything else. Your anchor is the necklace you choose first, the one the other layers exist to support. Without a clear anchor, all three chains compete for attention and the stack looks random rather than styled. Pick your anchor before you even think about what else goes on.
One focal point is what separates a deliberate, polished stack from a jewelry pile.
How to identify your anchor piece
Your anchor piece is usually your most visually significant necklace: the one with the largest pendant, the chunkiest chain, or the most distinct material. A layered pearl strand, a coin pendant, or a bold gold link chain all work well as anchors because they read immediately as the centerpiece of your look.
Pendant size and chain weight are your two quickest ways to spot the anchor in your collection. If one necklace naturally draws your eye first when you lay everything out on a flat surface, that's your anchor. Keep it at your preferred layer position, then build the rest of the stack around it.
How to layer around your anchor
Once you've chosen your anchor, place it at the middle or outer layer so it has visual room to land. Put a thinner, cleaner chain above it to frame the neckline, and if you want a third piece, keep it longer and simpler so it trails below without competing.
Use this template as your starting point for necklace layering ideas built around a single anchor:
| Layer | Piece type | Role in the stack |
|---|---|---|
| First (shortest) | Thin chain, no pendant | Frames the neckline |
| Second (mid) | Anchor piece with pendant | Visual focal point |
| Third (longest) | Simple chain or bar necklace | Adds length without noise |
Step 3. Mix metals and textures without chaos
Mixing metals used to be treated as a style mistake, but that thinking is outdated. Gold and silver, or gold and two-tone pieces, can sit together in the same stack as long as you follow a simple ratio: pick one dominant metal and let the other play a supporting role. The same logic applies to texture. Smooth chains next to twisted rope or beaded links create contrast that makes each piece more visible, not less.
The 70/30 rule works well here: let one metal fill roughly 70% of the stack and use the other as an accent.
When to mix gold and silver
Gold-dominant stacks tend to feel warmer and work well with earthy tones, while silver-dominant stacks read as cooler and pair naturally with blues, whites, and grays. If you want to mix both metals, keep your anchor piece in your dominant metal and use the secondary metal on just one other layer. A clean way to blend them is with a two-tone chain, which acts as a natural bridge between the two finishes so the switch doesn't look accidental.
| Metal combination | Best for | What to avoid |
|---|---|---|
| All gold | Warm-toned outfits, earth tones | Overloading with pendants |
| All silver | Cool-toned outfits, monochrome looks | Chains that are too similar in thickness |
| Gold + two-tone | Most outfits, flexible everyday stacks | Using three separate metals at once |
How to add texture without visual noise
Texture works the same way as metal contrast: vary it between layers rather than stacking similar finishes on top of each other. Pair a smooth box chain with a twisted herringbone or a delicate cable chain to give each layer a distinct surface quality your eye can separate at a glance. For necklace layering ideas that include pearls or beaded chains, treat those as your texture anchor and keep the remaining layers in plain metal to balance the look.
Step 4. Match your stack to your outfit neckline
Your neckline determines how much of your stack is actually visible, which means the wrong length combination can disappear behind fabric or compete directly with your collar. Before you put any necklace on, look at your neckline and treat it as the frame for your stack. The right starting layer sits just above or at the neckline edge so it anchors the look rather than hiding under it.
Your neckline is the frame and your stack is the artwork. If the frame cuts through the artwork, neither one reads clearly.
Crew necks and high necklines
A crew neck or turtleneck covers most of your collarbone, which leaves very little room for short chains to show up at all. Skip the choker layer entirely and start your stack at 18-20 inches, letting your pieces fall just below the collar edge or onto the fabric. Longer chains in the 22-24 inch range work particularly well here because they drop below the neckline and sit on the chest where they stay fully visible throughout the day.
V-necks and scoop necks
V-necks and scoop necklines open up the most layering real estate, which means you can run a full three-layer stack without any piece getting swallowed by the fabric. Your shortest chain should sit at or just above the collar's lowest point, your mid-layer follows the V-shape naturally, and your longest piece draws the eye downward. These necklace layering ideas work especially well with pendant-heavy stacks because the neckline creates a natural visual triangle that your chains reinforce.
| Neckline type | Best starting length | What to avoid |
|---|---|---|
| Crew / turtleneck | 18-20 inches | Chokers, anything under 16 inches |
| V-neck / scoop | 14-16 inches | Chains longer than 26 inches |
| Strapless / off-shoulder | 14-16 inches | Pendant-heavy mid layers that shift around |
| Collared shirt | 18-20 inches | Layering pieces over the collar itself |
15 necklace layering ideas to copy today
These necklace layering ideas are organized by style category so you can jump straight to what fits your outfit. Every combination below lists the specific lengths and piece types you need, making it easy to pull from what you already own or identify exactly what to add next.
Minimal and everyday stacks
These five stacks keep things clean and simple for daily wear. The contrast here is subtle, which is why each combination specifies a clear length gap and varied chain weight so the layers stay distinct without overcomplicating your look.
- 16" plain gold chain + 20" small coin pendant
- 14" pearl choker + 18" thin gold chain
- 16" cable chain + 22" bar necklace
- 18" twisted rope chain + 22" delicate drop pendant
- 14" choker + 18" chain + 22" plain box chain
Bold and statement stacks
These five combinations push further with mixed textures, larger pendants, and stronger visual anchors. Each one is built around a single anchor piece, with two supporting chains that add depth without competing for attention.
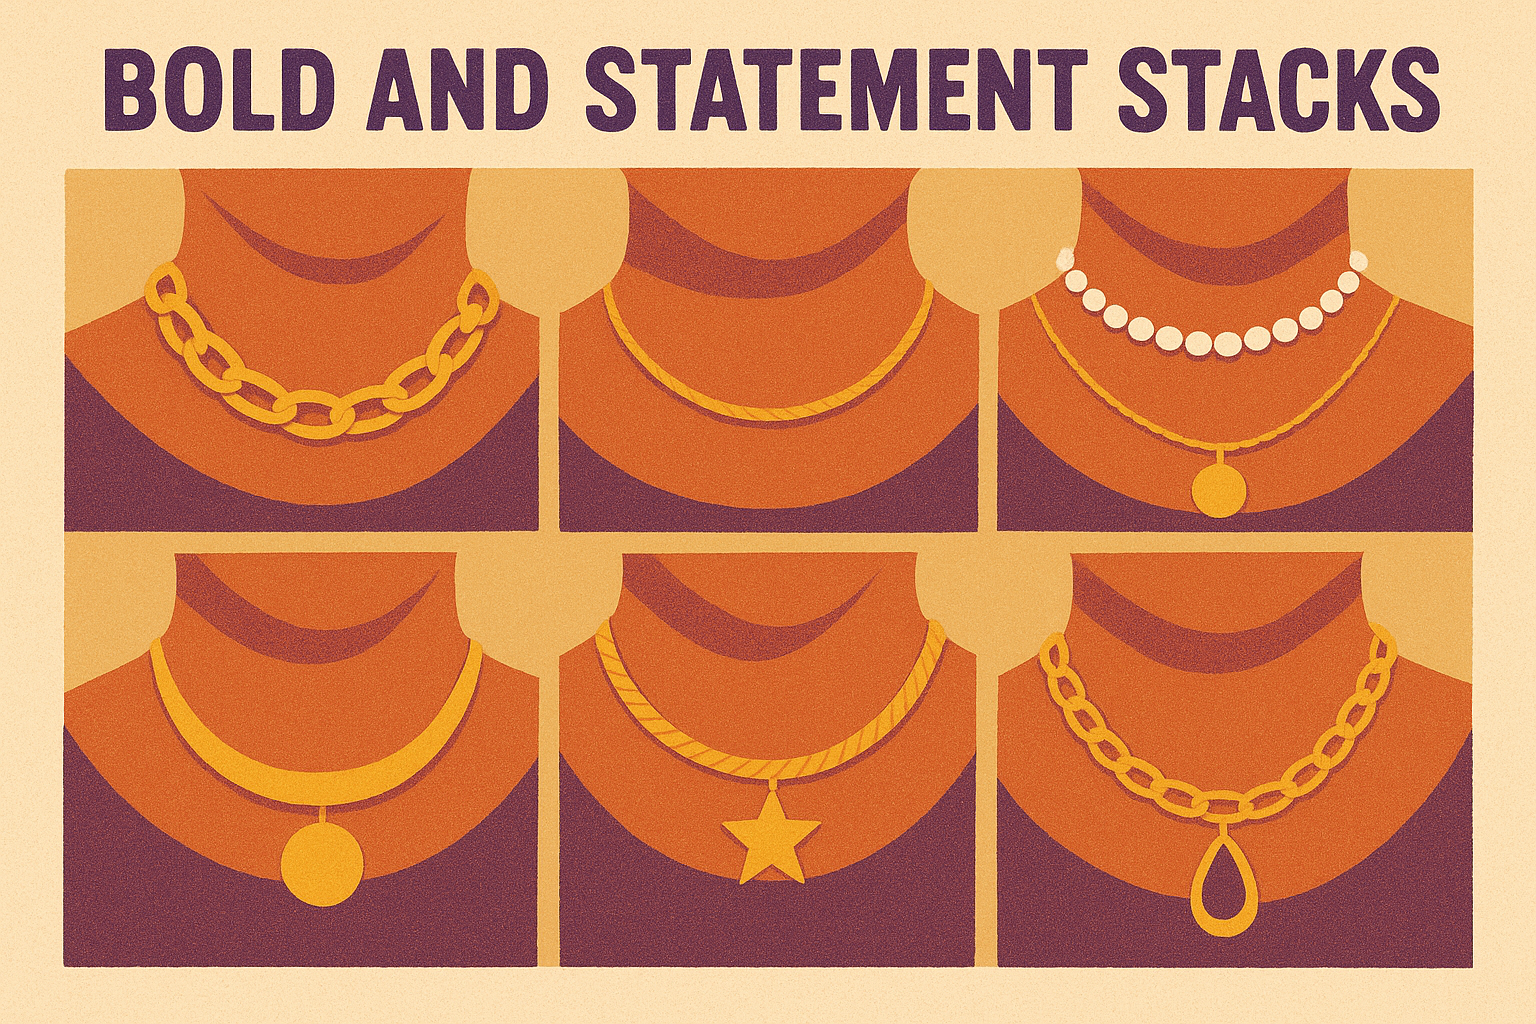
Pick one statement piece as your anchor, then keep the remaining layers simple so the focal point actually lands.
- 16" chunky gold link + 22" thin chain
- 14" gold choker + 18" pearl strand + 22" chain
- 16" herringbone + 20" star pendant + 24" plain chain
- 14" collar necklace + 20" coin pendant chain
- 16" gold chain + 20" two-tone pendant + 24" plain link
Occasion-ready stacks
These five stacks are built for dinners, events, and anything dressed-up, where your jewelry needs to carry more visual weight than a typical daily combination.
- 14" diamond-cut chain + 18" stone pendant + 22" plain chain
- 16" layered pearl + 22" gold chain
- 18" lariat + 14" thin choker
- 16" collar + 20" layered chain set + 24" charm necklace
- 14" choker + 18" initial pendant + 22" link chain
Easy ways to stop tangles and keep shine
The biggest enemy of any layered stack is not the wrong length or the wrong metal. It's tangling and tarnish. Chains that knot together mid-day pull your stack out of shape and scratch delicate surfaces, while dull or discolored metal makes even the best necklace layering ideas look cheap and careless. A few simple habits fix both problems before they start.
How to prevent tangles
Clasp placement is your first line of defense against tangling. When you put multiple chains on at once, move each clasp to a different position on the back of your neck so they don't all cluster in the same spot and lock together. Another reliable fix is the lobster clasp trick: clip one necklace's clasp onto another necklace's chain before you put them on, which anchors both pieces relative to each other and keeps them from crossing throughout the day.
Separating your clasps by a few inches on the back of your neck is the single fastest way to stop a layered stack from tangling.
For storing your layers between wears, use this simple method:
- Lay each chain flat in its own section of a divided jewelry tray
- Hang shorter chains on individual hooks to prevent kinking
- Drop a small anti-tarnish strip into any drawer or box where you store gold-plated pieces
How to keep shine longer
Gold-plated chains lose their finish fastest when they contact moisture, perfume, and skin oils. Put your stack on after you apply lotion, sunscreen, or fragrance, and take it off before you shower or swim. When you're done wearing your pieces, wipe each chain with a dry microfiber cloth to remove any residue before you store them. That single step extends the life of your finish significantly compared to dropping chains directly back into a drawer untouched.

Your next stack
You now have everything you need to build a layered necklace look that actually holds together. Length spacing, a single anchor piece, metal ratio, and neckline alignment are the four variables that determine whether your stack looks deliberate or thrown together. Work through each one in order and you'll land on a combination that works for your wardrobe and your style.
The necklace layering ideas in this guide are starting points, not rules. Swap in pieces you already own, adjust lengths by a few inches, and test combinations until the proportions feel right on your body. The more you experiment with what you have, the faster you'll develop an instinct for what works together.
When you're ready to add new pieces to your stack, browse the necklaces at Ezra Gems for gold-plated chains and pendants built to layer cleanly and wear daily without tarnishing.
Leave a comment