


Layering necklaces is one of the easiest ways to elevate any outfit, but getting the lengths right makes or breaks the whole look. If you've ever stacked two chains only to watch them tangle into a single clump at your collarbone, you already know that the best necklace lengths for layering depend on more than just grabbing a few favorites and clasping them on. Spacing, proportion, and neckline all play a role.
This guide breaks down the specific necklace lengths that work together, where each one sits on your body, and how to combine them for a clean, tiered effect. Whether you're pairing two delicate chains or building a full three-piece stack, you'll walk away knowing exactly which measurements to reach for. At Ezra Gems, layering is built into how we design, from our Just Gold collection to our Stack & Slay pieces, so we put this guide together from real styling experience, not guesswork.
Here's everything you need to get your layers right on the first try.
Necklace length basics and measuring at home
Before you start stacking, you need to know where each length actually falls on your body. Necklace sizing isn't universal - a 16-inch chain sits differently on a person with a narrower frame than it does on someone with broader shoulders. Knowing the standard length ranges and how to verify them against your own proportions is the foundation for choosing the best necklace lengths for layering.
Standard necklace lengths and where they fall
Jewelry makers use a consistent set of standard length increments - typically in 2-inch steps - and each one lands at a different point on the body. The table below maps those lengths to body placement so you can visualize your starting stack before you buy anything.
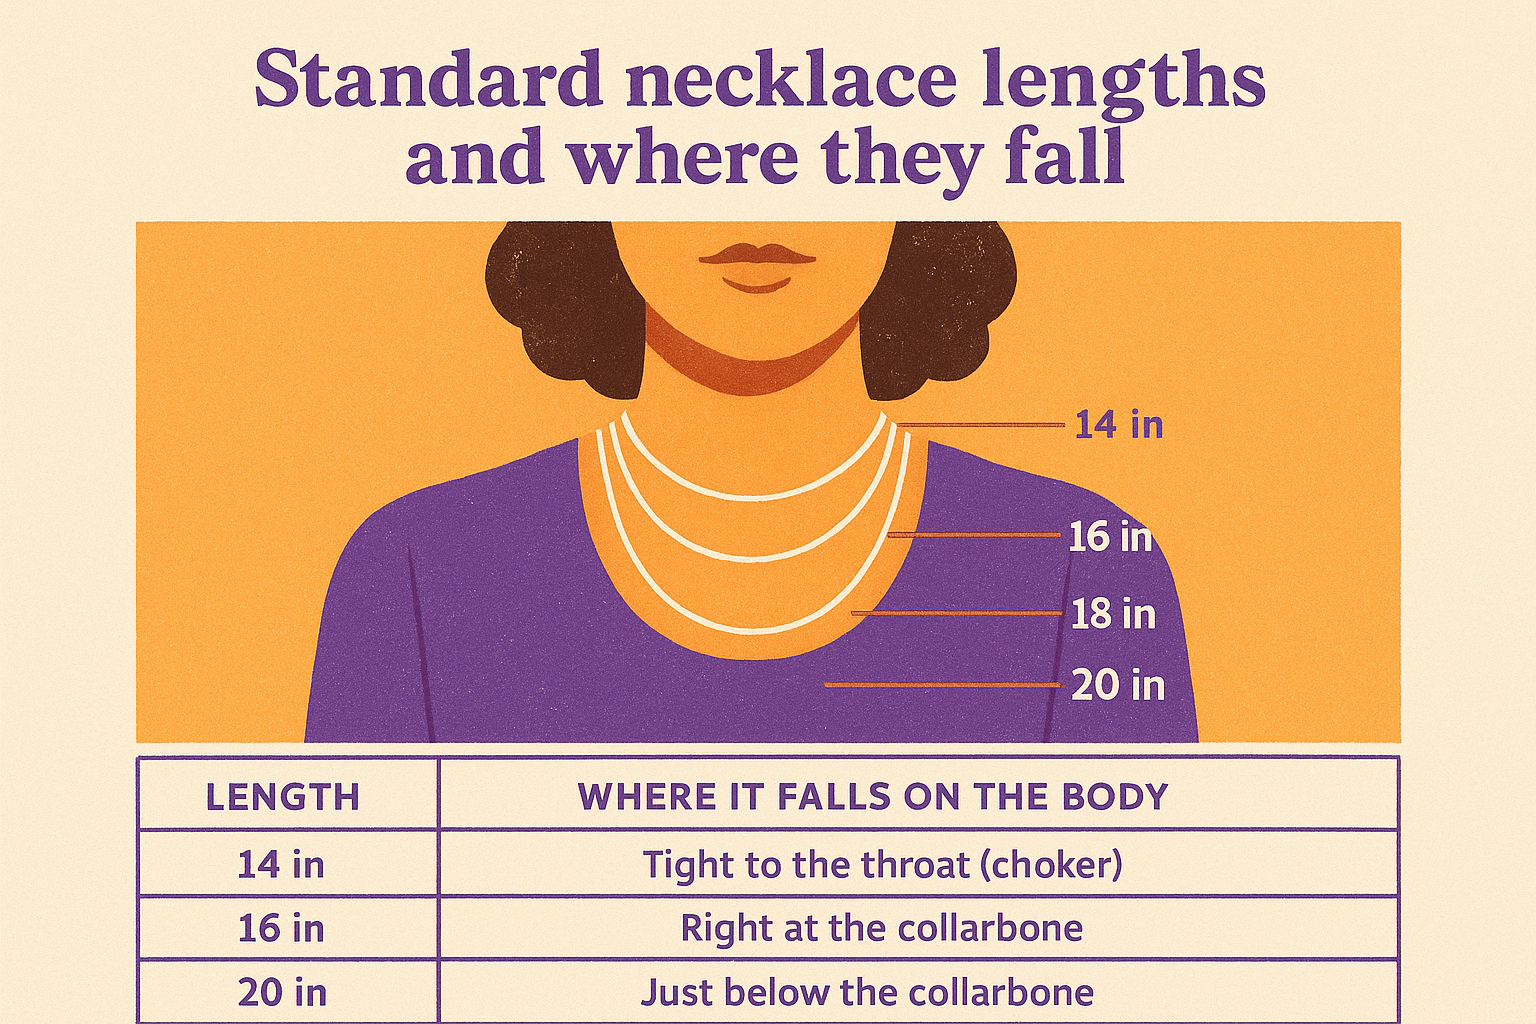
| Length | Where It Falls on the Body |
|---|---|
| 14 in | Tight to the throat (choker) |
| 16 in | Right at the collarbone |
| 18 in | Just below the collarbone |
| 20 in | Two to three inches below the collarbone |
| 22 in | Upper chest |
| 24 in | Mid-chest |
| 30 in | Near the bust line or below |
These placements shift based on your neck length and body frame, so treat them as starting points rather than rigid rules. A 16-inch necklace might land at the collarbone on one person and sit slightly higher on another.
A 16-inch necklace is the most practical starting point for a layered look because it frames the collarbone cleanly without crowding whatever you add below it.
How to measure yourself at home
You don't need any special equipment. A flexible fabric measuring tape or a piece of string combined with a standard ruler will give you everything you need. Follow these steps before you build your next stack:
- Stand in front of a mirror with your usual neckline visible.
- Hold the measuring tape at the back of your neck where a clasp would sit.
- Bring both ends to the front and note where specific inch marks land - right at your collarbone, two inches below it, mid-chest.
- Write those numbers down. These become your personal anchor points for every layered combination you build.
If you're using string, mark the measurement point with a pen and lay the string flat against your ruler. Repeat this for each length you plan to add before you commit to a purchase. Getting your anchor points right ahead of time removes the guesswork and keeps your layers landing exactly where you want them.
Step 1. Choose a 2 to 4 inch length spread
The most reliable rule for the best necklace lengths for layering is to keep at least 2 inches of space between each piece. When two chains sit within an inch of each other, they visually merge and lose definition. A 2 to 4 inch gap gives each layer its own visual lane, so the eye reads the stack as separate pieces rather than one tangled cluster. This spacing principle applies whether you're wearing two chains or five.
Sticking to a 2-inch minimum gap between each chain prevents visual crowding and keeps every layer distinct.
How to apply the spread across two, three, or four layers
The spacing rule scales directly with the number of pieces you add. Start with your anchor length - typically a 16-inch collarbone chain - and build outward in measured steps of 2 to 4 inches. Here's how that plays out across common stack sizes:
| Stack Size | Example Lengths | Gaps |
|---|---|---|
| 2 layers | 16 in + 18 in | 2 in |
| 3 layers | 16 in + 18 in + 22 in | 2-4 in |
| 4 layers | 14 in + 16 in + 20 in + 24 in | 2-4 in |
Your spreads don't have to be perfectly uniform, but each jump should clear at least 2 inches. A three-piece stack at 16, 18, and 22 inches works well because the bottom layer drops far enough to anchor the whole look. Avoid locking in equal spacing across every layer if it feels rigid - a slightly wider gap at the bottom adds movement and keeps the proportions balanced.
Step 2. Match lengths to neckline and outfit
The lengths you choose need to work with what you're wearing, not just each other. Your neckline sets the visual starting point for the entire stack, and ignoring it leads to chains that get buried inside a collar or compete with an already-busy opening. When you match your anchor length to your neckline first, the rest of your layers fall into place more naturally.
Neckline pairing guide
Different necklines call for different starting points. A crew neck or turtleneck pushes everything upward visually, so your anchor layer should start longer - a 20-inch chain or beyond - to keep the stack visible below the fabric. For V-necks and scoop necks, a 16 to 18-inch anchor works well because the open neckline already frames the collarbone. Square necklines pair cleanly with a single chain running just inside or just below the fabric edge, then layered outward from there.
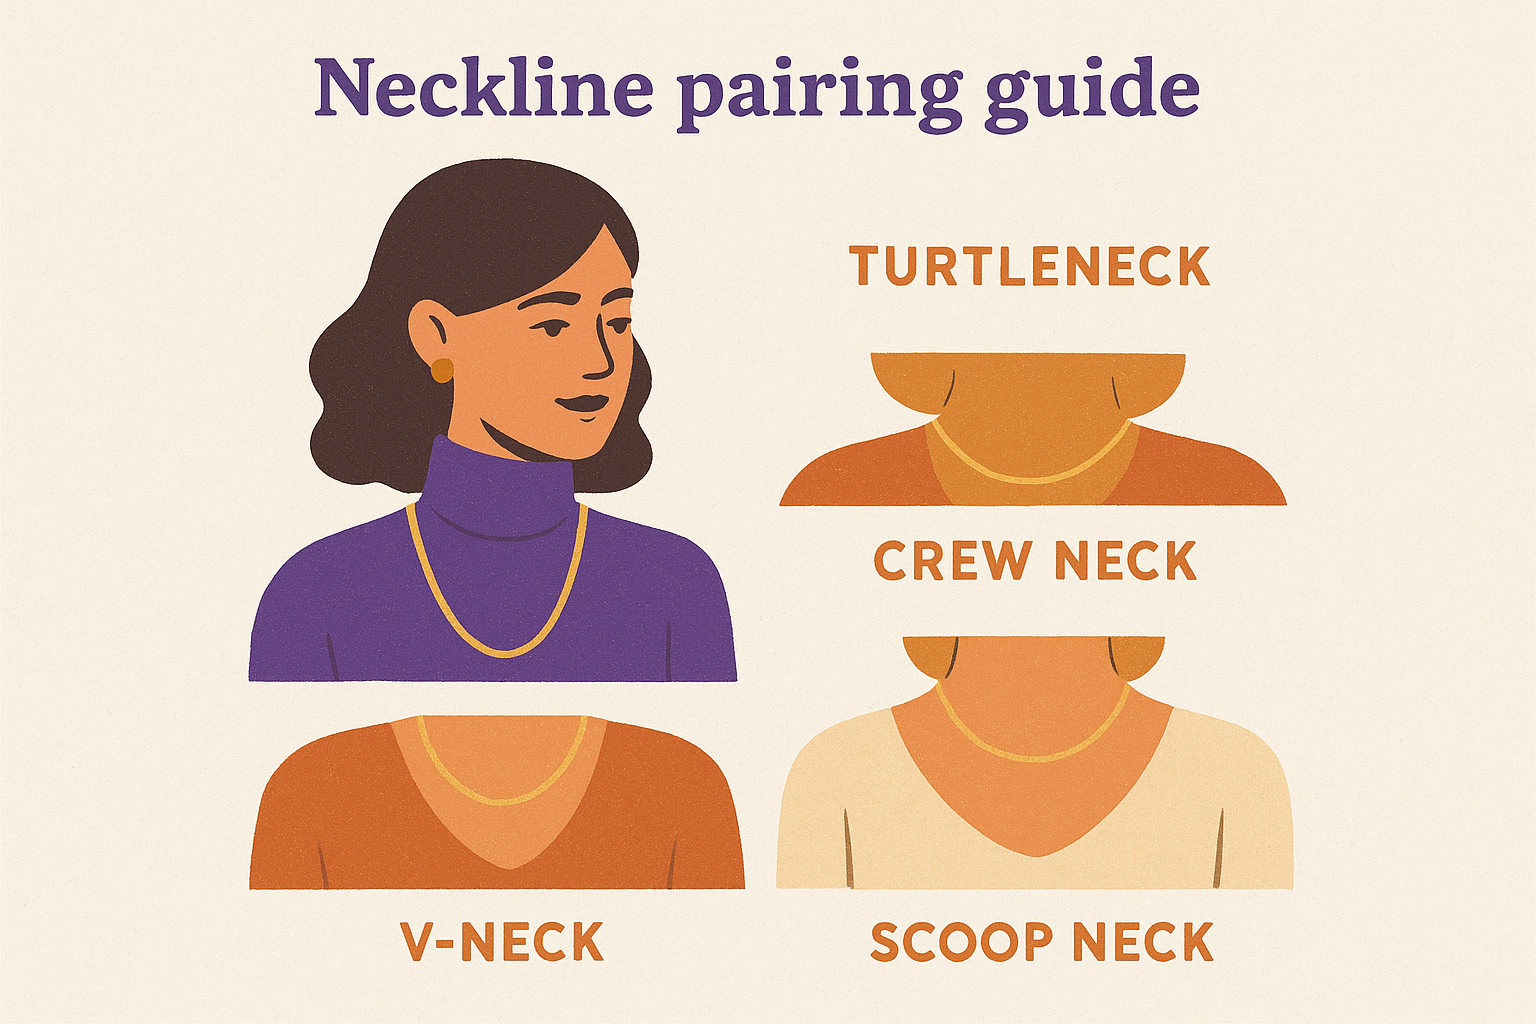
Your neckline is your first layer - build the rest of your stack around it, not around what looked good on someone else.
| Neckline Type | Recommended Anchor Length |
|---|---|
| Turtleneck | 20 in or longer |
| Crew neck | 18 to 20 in |
| V-neck | 16 to 18 in |
| Scoop neck | 16 to 18 in |
| Square neck | 16 in |
| Off-shoulder | 14 to 16 in |
Outfit weight and layering density
Busy patterns and heavy textures compete with stacked necklaces, so keep your layers minimal - two pieces at most - when wearing bold prints or chunky knits. Clean, simple outfits like a fitted white tee or a solid-color dress give you the most room to explore the best necklace lengths for layering, pulling off three or four pieces without visual overload.
Use this quick reference when deciding how many layers your outfit can support:
- Solid or minimal print: up to four layers
- Subtle pattern or light texture: two to three layers
- Bold print or heavy knit: one to two layers maximum
Step 3. Mix chains, metals, and pendants
Combining different chain styles and textures is what separates a flat, forgettable stack from one that draws the eye. When every piece looks identical, the layers blend together even if your spacing is perfect. Your goal is visual contrast - pairing a delicate cable chain with a thicker rope or a flat snake chain creates depth because the eye has distinct elements to move between.
Mixing at least two different chain textures is more effective than matching every piece in your stack.
Vary chain textures across your layers
Thin chains work best at the top of your stack because they sit close to the collarbone without adding bulk. As you move down, shift toward slightly heavier or wider styles to anchor the look visually. Here's a practical combination guide:
| Position | Chain Style | Example Length |
|---|---|---|
| Top layer | Delicate cable or satellite | 16 in |
| Middle layer | Box chain or snake chain | 18 to 20 in |
| Bottom layer | Rope chain or chunky link | 22 to 24 in |
Blend metals and place pendants strategically
Gold and silver together reads as intentional, not accidental. Pairing a yellow gold chain with a silver pendant or a two-tone piece gives your stack dimension without adding extra length. When choosing the best necklace lengths for layering with pendants, place your pendant on the longest chain so it sits below your bare chains and becomes the visual endpoint of the whole stack.
Pendants also need room to breathe - avoid placing a pendant chain directly against another pendant chain. One pendant per stack is usually enough to keep the look clean.
Step 4. Keep layers from tangling
Getting your spacing right and choosing the best necklace lengths for layering only works if the chains actually stay in place. Tangling happens when chains share similar weight and hang at nearly identical lengths, causing them to drift together and interlock throughout the day. The fix is a combination of the right clasp technique and a few physical adjustments that hold each layer in its own position.
The fastest way to prevent tangling is to secure all your chains through one anchor point using a layering clasp or separator bar.
Use a layering clasp or separator
A layering clasp (sometimes called a necklace separator or detangler) is a small device that holds multiple chains at a fixed distance from each other. You thread each chain through a separate ring on the separator, then fasten the whole unit at the back of your neck with one clasp. Most separators hold two to four chains and cost just a few dollars, making them one of the simplest tools for a clean stack.
If you don't have a separator available, run all your chains through the clasp of your longest necklace before fastening it. This pins every chain to a single anchor point at the back and dramatically reduces movement throughout the day.
Adjust chain weight and texture to reduce drift
Heavier chains stay in position better than ultra-fine ones, so placing your lightest chain at the top and progressively heavier pieces below keeps each layer tracking in its own lane. Pairing different textures - a smooth cable chain against a textured rope chain - also creates natural friction between pieces, which slows the drift that leads to knots before you even leave the house.
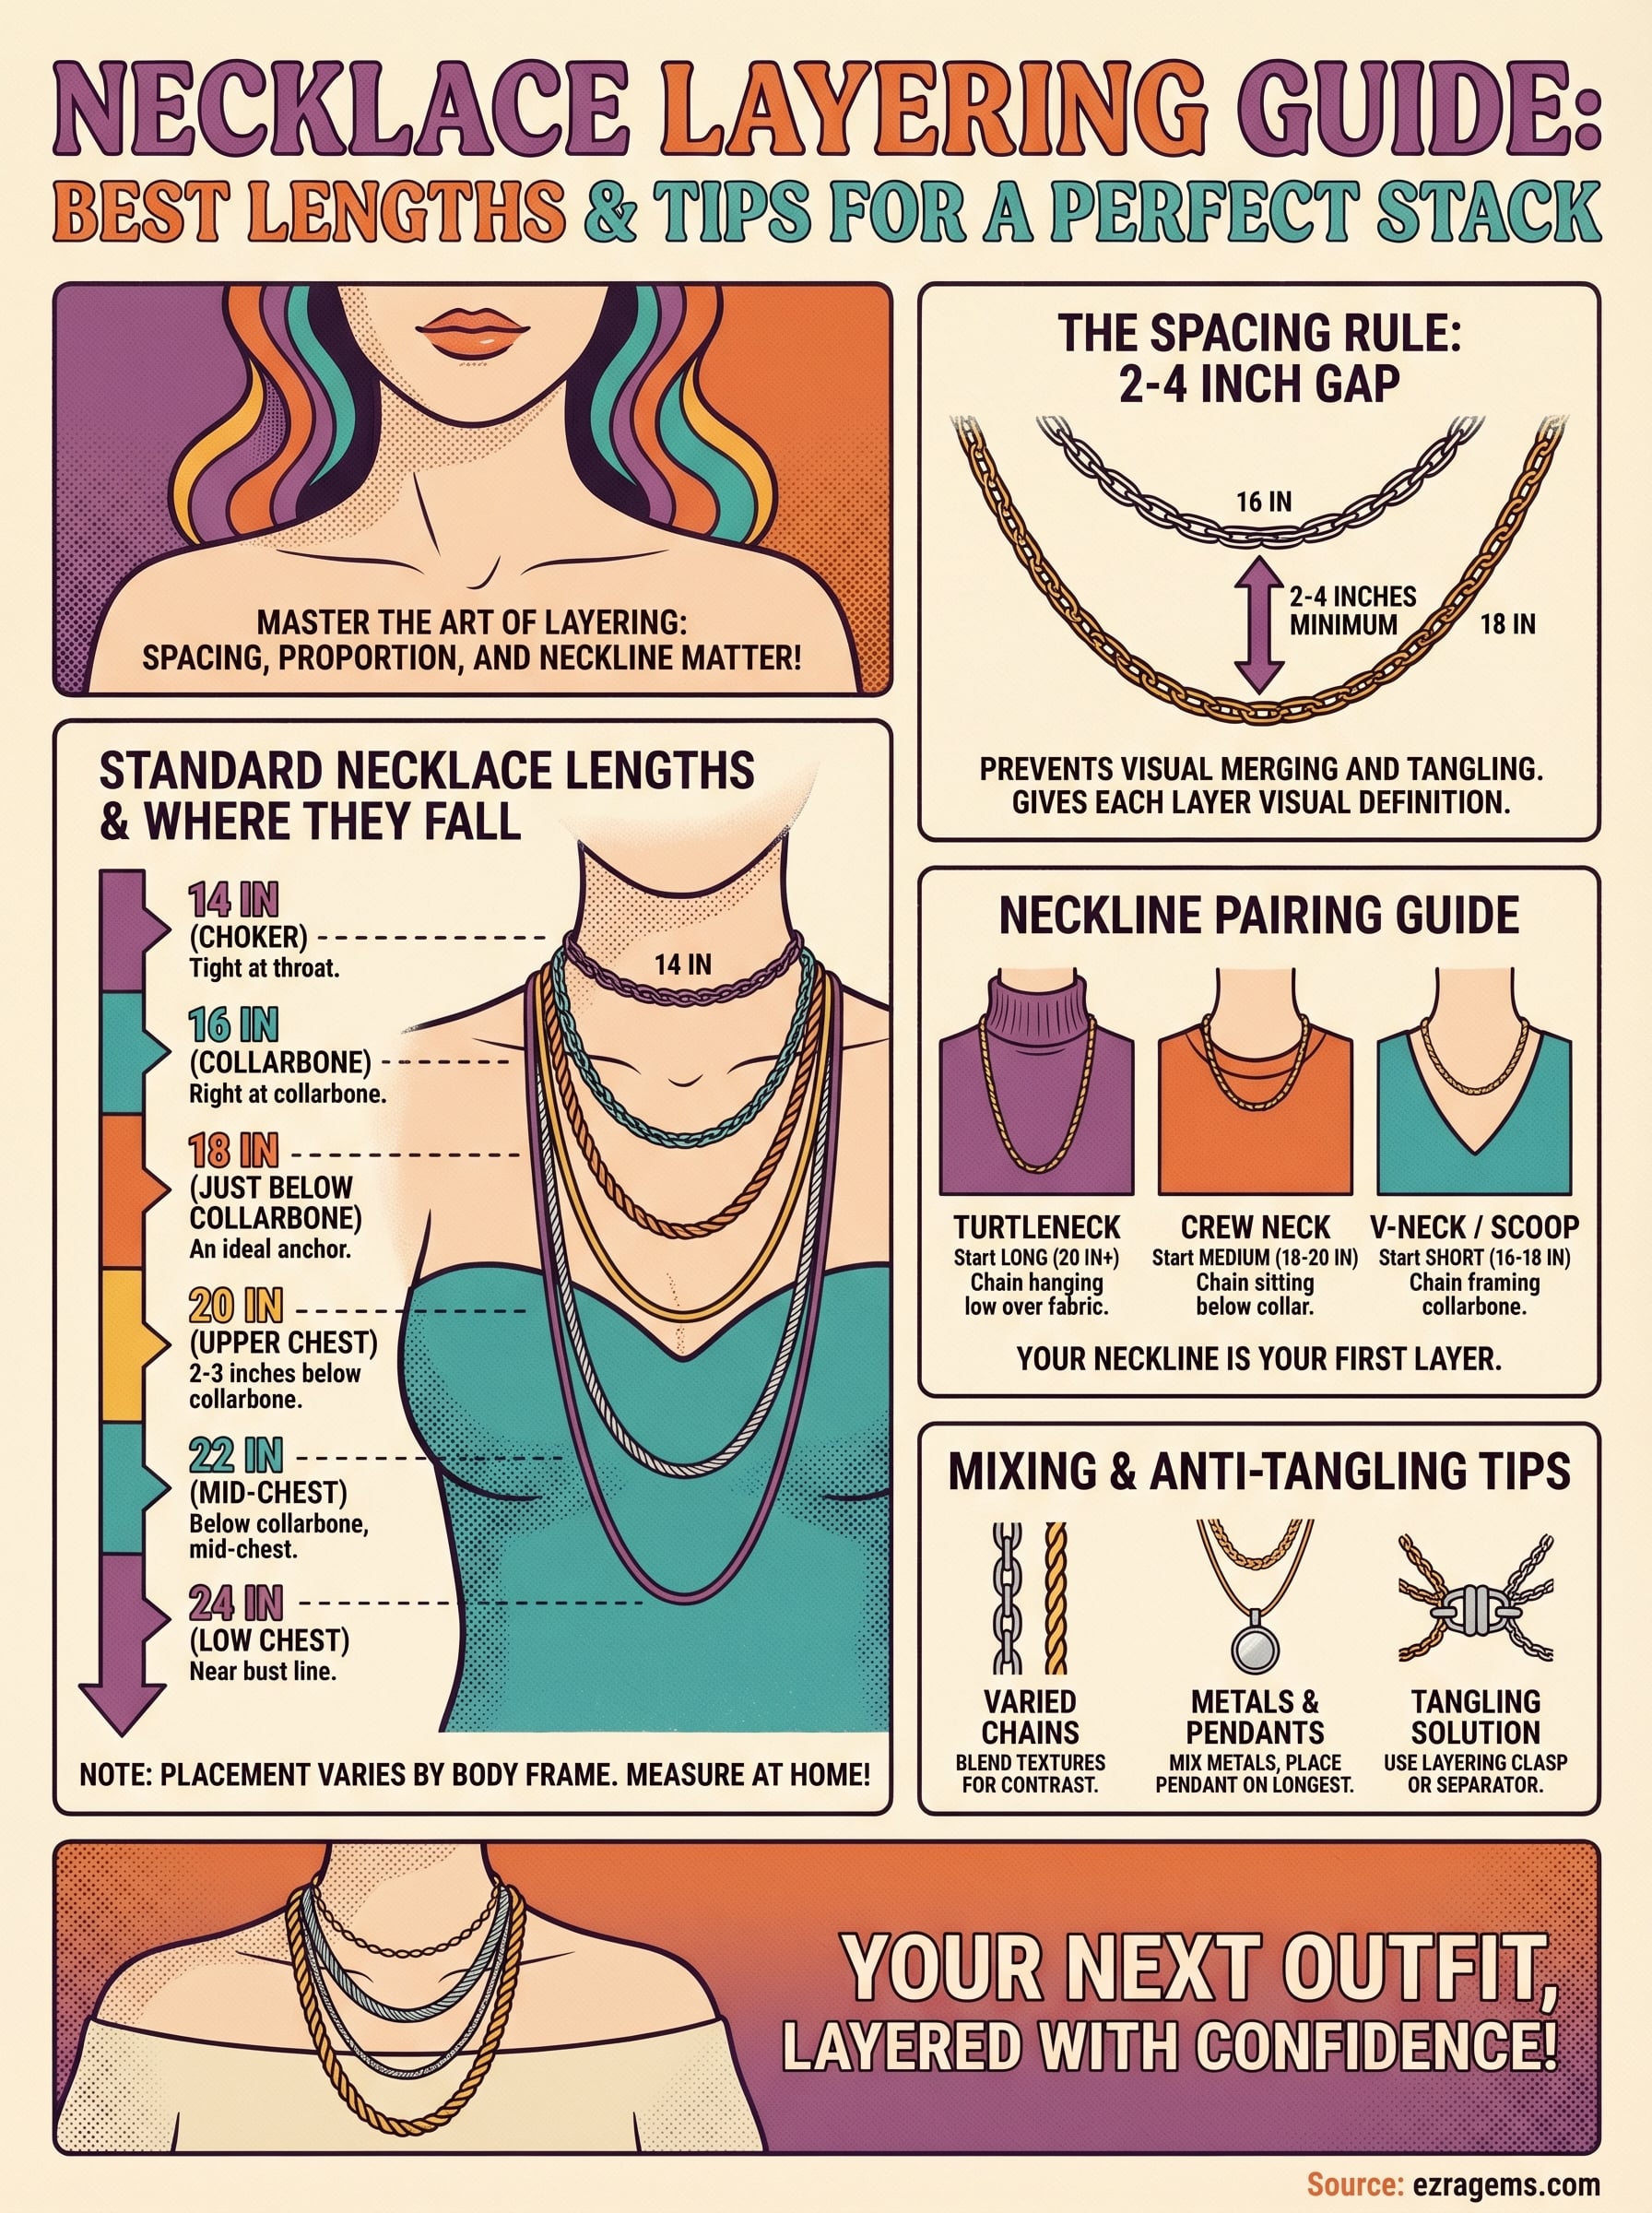
Your next outfit, layered
You now have everything you need to build a stack that holds together all day. Start with your anchor length at the collarbone, apply the 2 to 4 inch spacing rule, and match your starting point to your neckline before adding anything else. The best necklace lengths for layering are the ones that fit your proportions, your outfit, and your chain textures working together - not a formula copied from someone else's look.
Getting the first stack right takes one careful trial run. Measure your anchor points at home, lay out your chains before putting them on, and use a separator if tangles are a recurring problem. Small adjustments at the start save you from rearranging everything mid-day. When your layers are sitting exactly where you want them, the whole outfit pulls together without extra effort. Browse the Ezra Gems necklace collection to find pieces built for stacking from the start.
Leave a comment